 SpotPlot
SpotPlot Manual
Everything you need to go from an empty show to printed spot paperwork. New to SpotPlot? Tips also appear the first time you open each screen, and Help → Show Tips Again brings them back.
Install and sign in
- Download SpotPlot and open SpotPlot.dmg.
- Read the license agreement and click Agree.
- Drag SpotPlot into your Applications folder, then open it from there.
- Enter your email address and the license key from your purchase email, then click Activate SpotPlot.
SpotPlot needs a Mac with Apple silicon (M1 or newer). Your license works on 2 Macs. SpotPlot updates itself; you can also choose SpotPlot → Check for Updates.
How SpotPlot works
You set up a show once: its spots (with their operators and gels), its scenes and its characters. Then you build the cue list, where each light cue is a row and each spot has a column. Everything you print comes from the cue list, so your paperwork is always current.
- Create the show and its spots.
- Add scenes and characters.
- Build the cue list.
- Print spot sheets, the caller sheet, the color load, spot notes and the cast sheet.
Create a show
On the Home screen, click + New Show (or press ⌘N).
- Show info: title (the only required field), theatre, producer and an optional show logo. The logo prints on every sheet.
- Lighting team: lighting designer, associate, assistant, production electrician and programmer. Their names appear in the page headers.
- Spots: a show can have up to 4 spots. See the next section.
Click Save Show. You can change any of this later in Show Settings.
Spots and color frames
For each spot, set the operator name, location (like "FOH Left") and fixture type (pick from the list, or choose Other and type it).
Color frames
Each spot has six color frames, F1 to F6. Type a gel number or name in a frame to search the Rosco, Lee and GAM catalogs, and pick the gel.
- Permanent color: tick it for a gel that always stays in the fixture, then pick the gel. It shows as PERM on the sheets.
- Copy colors from…: same gel load on every spot? Fill in one spot, then use this menu on the others to copy all of its frames.
The show dashboard
Click a show on the Home screen to open its dashboard. From here you reach the Cue List, Scenes, Characters, Spot Notes and Print. The dashboard also lists the spots and lighting team.
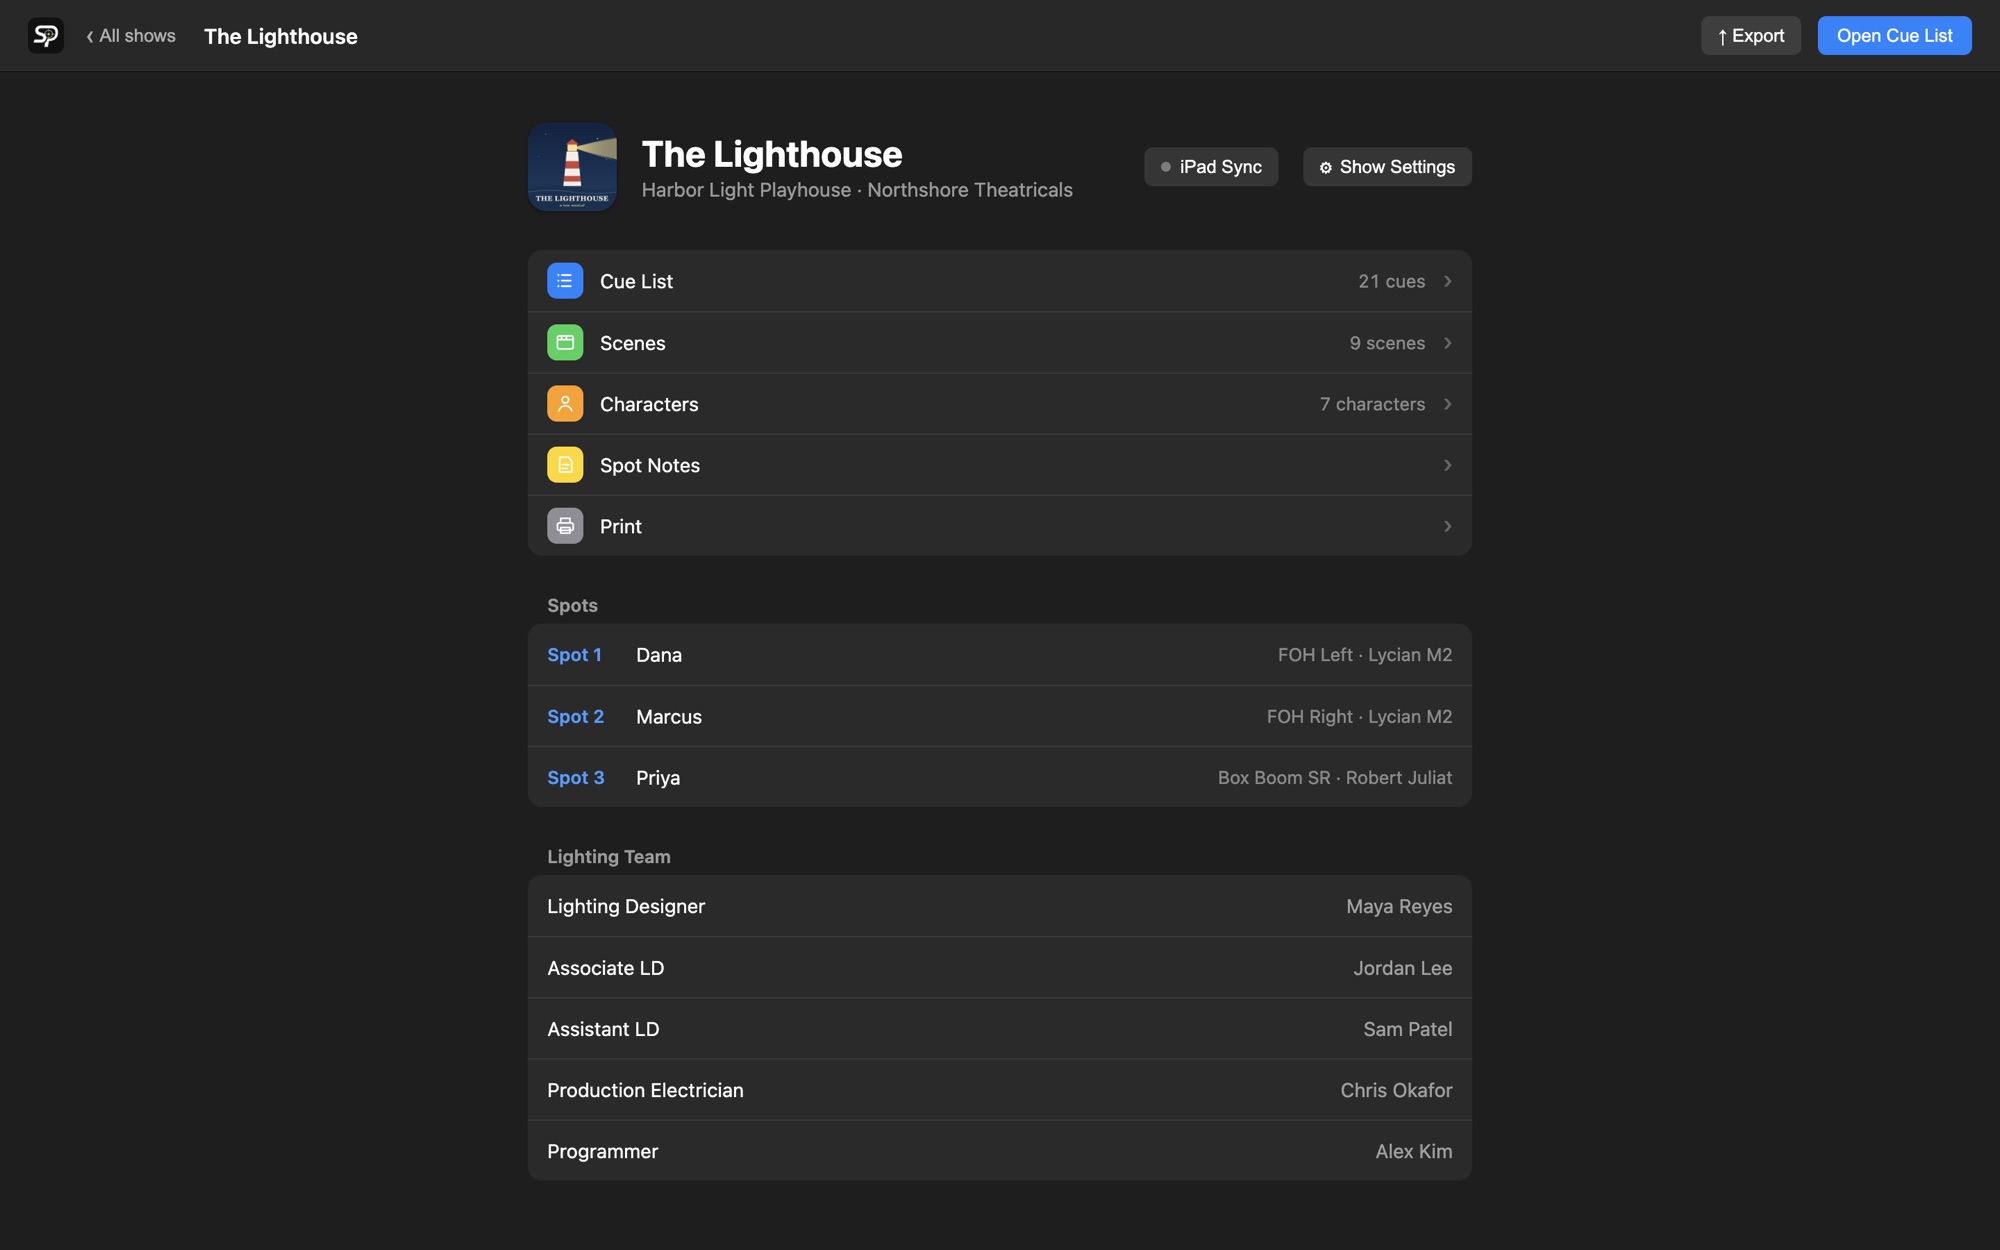
- Show Settings opens every setting for the show (see Show Settings).
- Export saves the whole show as a .spotplot file (see Sharing).
- iPad Sync is coming with the iPad app for operators.
Scenes
Scenes break the show into sections. They become the green headers in the cue list and the black bars on your prints.
- Add a scene with a label (like "Scene 1") and an optional song.
- Mark a scene as an act break and it shows in orange.
- Use the arrows to put scenes in show order, and Edit to change one.
You can also add a scene from the cue list with + Scene.
Characters
Add each character with the actor's name, costume notes and a photo (click the photo box, or drop an image on it). Characters fill the character menu in every cue.
- The Print checkbox decides who appears on the printed cast sheet.
- Drag the handle or use the arrows to reorder; Edit changes a character.
- Group pickups like "Rizzo and Danny" can be their own character, or typed into a cue as a one-off (see below).
Photos are copied into SpotPlot, so moving or deleting the original file won't break them.
The cue list
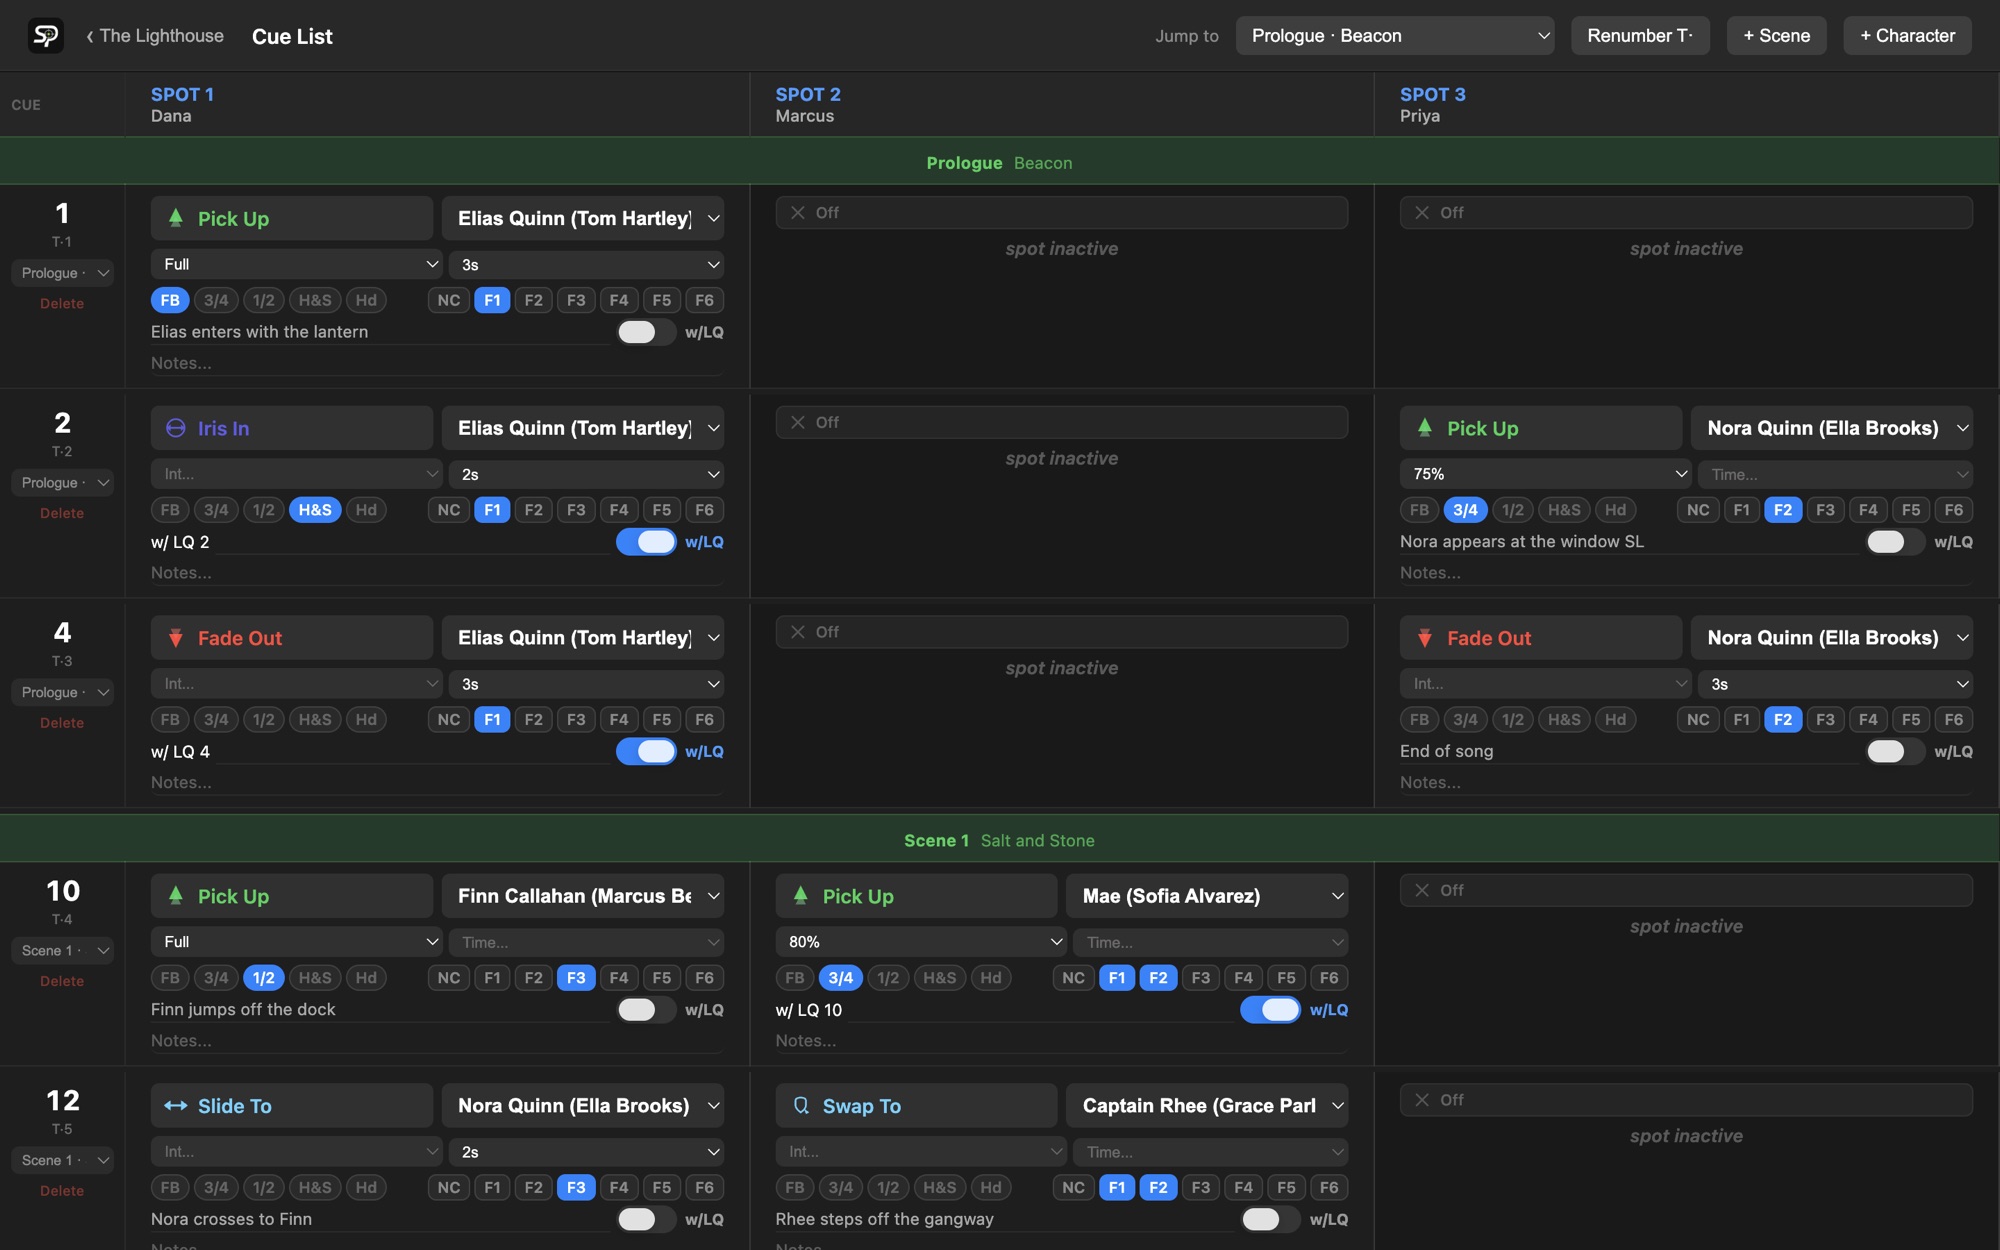
Open the cue list from the dashboard. Each row is one light cue; each spot has a column.
Adding cues
- + Add cue at end at the bottom of the list, or press ⌘=.
- To add a cue between two others, hover between them and click + insert cue here.
- A new cue picks up where each spot left off: spots that were on keep their character and color; spots that faded out start as Off.
The cue column
- Click the number to type the LQ (the light cue number).
- T· is the spot cue number operators use to keep their place. It's printed under each LQ.
- The menu under the number sets the cue's scene. Delete removes the cue.
Renumber T·
Inserting cues makes T· numbers jump around. Click Renumber T· at the top of the cue list to number them 1, 2, 3… from top to bottom. Your cue order, scenes and LQ numbers never change. If you've already handed out sheets, reprint them afterward so everyone's T· numbers match.
Getting around
Use Jump to to go straight to a scene. Scene headers stay pinned at the top while you scroll; a [bracketed] header means you're partway through that scene.
Filling in a cue
Each spot's box in a cue holds what that spot does.
| Field | What it's for |
|---|---|
| Action | Click to choose: Pick Up, Fade Up, Fade Down, Fade Out, Fade In Place, Bump Up, Bump Out, Swap To, Slide To, Stay With, Iris In, Iris Out, Iris/Fade Up, Iris/Fade Down, Iris/Fade Out, Up & Out, Dump & Restore, Bump Color, Roll Color, Ballyhoo, Off, or Tracked. Some actions fill in a starting intensity and time for you. |
| Character | Who the spot is on. Pick from the list, or choose to type a custom name for this cue; SpotPlot offers to add it to the show's characters. |
| Intensity | Full, a percentage, Glow or Out. Prints as "@ Full". |
| Time | Fade time in seconds, or Custom. |
| Iris | FB (Full Body), 3/4, 1/2, H&S (Head & Shoulders), Hd (Head), plus any custom sizes. Click again to clear. |
| Color | Click the frames in use (F1–F6); two frames print as F1+F2. NC means no color. Hover a frame to see its gel. |
| When | The cue's "go" moment, like "Nora at the window". Turn on w/LQ to make it read "w/ LQ" plus this cue's number; it stays linked if you renumber. |
| Notes | Anything else for the operator. |
Off means the spot isn't used in that cue. Tracked clears the cue so the spot simply carries on from before.
In When and Notes, select text and press ⌘B, ⌘I or ⌘U for bold, italic or underline. Press ⌘Z to undo.
Highlights, notes and more
Double-click any spot's box in a cue to open its options:
- Highlight the whole cue, or just its When or Notes line, in yellow or red. Highlights print too.
- Ignore cue crosses the cue out without deleting it.
- Spot note: a note for the operator. A yellow dot marks cues that have one, and they collect on the Spot Notes screen.
Drag to copy or swap
Drag one spot's box onto another to copy it (with or without the character), or swap the two.
Show Settings
Open Show Settings from the dashboard.
| Section | What's there |
|---|---|
| Show Info | Title, theatre, producer, lighting team and logo. |
| Spot Settings | Each spot's operator, location, fixture and color frames; add a spot; copy colors; and swap all cue data between two spots for the whole show. |
| Spot Order | Drag to change the order spots appear in the cue list and on the caller sheet. |
| Cue Settings | Choose which cue details (action, character, intensity, iris, color, time, When, Notes) show on the cue list and which print. Hiding never deletes anything. |
| Iris Sizes | Add your own iris sizes with a short button label. |
| Custom Actions | Add your own actions, with an optional icon. |
| EOS Control, iPad Sync | Coming soon. |
Spot notes
The Spot Notes screen shows every spot note, grouped by spot and in cue order. Check a note off once you've given it; edit or delete notes here too. Print them from the Print screen.
Printing
Open Print from the dashboard and pick what to print. The preview on the right is the real PDF, page breaks and all, and it updates as you change options. Click Export PDF… to save it.
| Sheet | What it is | Options |
|---|---|---|
| Spot 1, 2… | One operator's sheet: their gel load across the top, then every cue. | Hide Off cues, hide Tracked cues, cue range (by T·), T· numbers |
| Caller sheet | All spots side by side, cue by cue. | T· numbers |
| Color load | Every spot's gel frames. | |
| Spot notes | Notes for operators. | All spots or one spot |
| Characters | The cast with photos on one page. | Costume notes |
Every sheet has a Label field for the page header (like "2-24 Dress Run") and "Page 1 of N" at the bottom. Color changes are highlighted in yellow, including each spot's first color, and a cue never splits across two pages.
Sharing and backups
Export a show
On the dashboard click Export (or press ⌘E) to save a .spotplot file. It holds the entire show: spots, gels, scenes, characters, every cue, notes, highlights, photos and the logo. Use it to send the show to your associate or another designer, or as a backup.
Import a show
Double-click a .spotplot file, or click Import on the Home screen (or press ⌘I). The show is added alongside your others, so nothing is overwritten.
Keyboard shortcuts
| Shortcut | Does |
|---|---|
| ⌘N | New show |
| ⌘E | Export the open show |
| ⌘I | Import a show |
| ⌘= | Add a cue (cue list) |
| ⌘Z | Undo (cue list) |
| ⌘B ⌘I ⌘U | Bold, italic, underline (in When and Notes) |
Still stuck? See Support.